
Urban and suburban kitchen gardening in Kenya is transforming how households access fresh, organic, and cost-effective vegetables. Whether you have a quarter-acre plot in Nakuru, a backyard garden in Eldoret, or a balcony in Nairobi, starting a high-yielding kitchen garden requires a solid plan, quality soil preparation, and reliable micro-irrigation.
This guide breaks down every step to starting your kitchen garden – from site selection to installing efficient 16mm drip line irrigation setups – and provides a complete material checklist you can order directly from Valuable Agrisystems.
1. Planning Your Kitchen Garden Space
A successful kitchen garden relies on high light exposure, reliable drainage, and proximity to a water source.
Selecting the Location
-
Sunlight Requirements: Most high-yield vegetables (tomatoes, capsicum, spinach, onions) require 6 to 8 hours of direct sunlight daily.
-
Proximity to Water: Position your garden near a water tap, raised storage tank, or rainwater harvesting collection point.
-
Protection from Pests & Pets: Erect light perimeter mesh or shade net barriers to keep domestic pets and farm animals out.
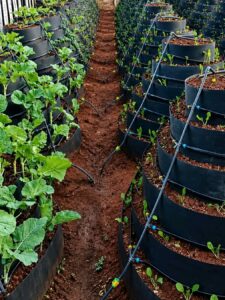
2. Selecting High-Yield Kitchen Crops
For beginners, select crops with short maturity cycles, continuous harvesting periods, and high market/household consumption rates.
| Crop Category | Recommended Crops | Spacing | Maturity / Harvest Period |
| Leafy Greens | Kales (Sukuma Wiki), Spinach, Swiss Chard, Traditional Vegetables (Terere, Managu) | 20 cm – 30 cm | 30 – 45 Days (Continuous Harvest) |
| Root & Bulb | Red Onions, Garlic, Beetroot, Carrots | 15 cm – 20 cm | 60 – 90 Days |
| Fruiting Crop | Tomatoes, Capsicum (Hoho), Chili, Cucumber | 30 cm – 40 cm | 75 – 90 Days |
| Culinary Herbs | Coriander (Dania), Rosemary, Basil, Mint | 15 cm | 21 – 30 Days |
3. Soil Preparation & Bed Building
Healthy soil is the foundation of a disease-free, nutrient-rich harvest.
-
Build Raised Beds (1 m Width): Construct beds that are 1 meter wide and raised 15 – 20 cm above ground level. A 1 m width allows you to reach the center of the bed from either side without stepping on or compacting the root zones.
-
Soil Aeration & Enrichment: Dig down 30 cm to loosen heavy clay soil. Incorporate well-decomposed organic cow or poultry manure at a ratio of 1 wheelbarrow per 2 m².
-
Pest Defense Preparation: Treat soil beds for soil-borne pests (cutworms, nematodes) prior to transplanting seedlings.
4. Water Management: Installing a Drip Irrigation Kit
Hand-watering with hoses or buckets causes water waste, leaf fungus, and uneven moisture distribution. A gravity-fed 16mm Drip Irrigation System connected to an elevated 100 – 500 L water drum delivers water directly to plant roots.
Why Use 16mm Drip Tape Lines?
-
70% Water Savings: Water drips precisely at root level without runoff or evaporation.
-
Weed Control: Water is supplied only to the crop line, leaving the paths dry and free of weeds.
-
Low Water Pressure Requirement: Runs effectively on gravity pressure from a tank elevated just 1 – 1.5 meters above the ground.
5. Complete Beginners Material Checklist
Below is the standard Bill of Quantities (BoQ) required to set up a standard 15 ft × 15 ft (4.57 m × 4.57 m) or 30 ft × 15 ft kitchen garden plot:
| Hardware Item | Technical Specifications | Purpose / Application |
| 16mm Drip Tape Irrigation Line | 15 cm or 20 cm Emitter Spacing, UV-treated | Primary watering lines placed along crop rows |
| 32mm HDPE Pipe (PN8) | 32 mm (1.25″) Mainline manifold | Connecting the elevated tank outlet to the drip lines |
| 16mm Take-off Connectors & Grommets | Rubber grommets + valve connectors | Joining 16mm drip laterals into the 32mm HDPE mainline |
| 16mm Line Joiners & End Plugs | Standard barb fittings | Sealing the ends of drip lines and repairing cuts |
| Yellow & Blue Sticky Cards | 20 cm × 25 cm Dual-sided adhesive | Chemical-free trapping of whiteflies, thrips, and aphids |
| 0.5mm HDPE Damliner / Tank Liner | 0.5 mm (500 Micron) UV-stabilized | Lining raised timber water boxes or custom water storage reservoirs |
| Shade Net (50% or 72%) | UV-treated high-density polyethylene | Protecting delicate seedlings from intense sun and heavy hail |
6. Pest & Disease Prevention Guide
-
Install Insect Traps: Hang Yellow Sticky Cards (for whiteflies, aphids, leafminers) and Blue Sticky Cards (for thrips) 15 cm above the plant canopy.
-
Use Shade Netting: Cover nursery beds or sensitive herbs with a 50% UV shade net to prevent heat stress and scorch during hot months.
-
Mulching: Cover exposed soil between rows with dry grass or straw to retain moisture, suppress weeds, and stabilize soil temperature.